 

Lesson Menu #2
Intermediate & Advanced.
Lesson Menu #3
Advanced & Ultra-Advanced.
Lesson Menu #4
Text lessons: All levels.

PRODUCTS:
GET ALL THE PRODUCTS AT ONE LOW PRICE.

SURPRISES ABOUND . . . For those with a bit of generosity
in their soul.
CLICK HERE , to see what I mean.
Intermediate & Advanced
Drummers
 Your future is waiting.
ALL MUSICIANS
MASTER
ALL RHYTHM,
This FASCINATING WAY!
 Discover the 'LOST KEY' for Unraveling
ALL the mysteries of rhythm, and musical time.
Discover the 'LOST KEY' for Unraveling
ALL the mysteries of rhythm, and musical time.
This work
is the crowning-achievement of my 50 year career, and it's
my proudest accomplishment.
It contains the potential to help YOU change the face of modern music!
You'll love it! CLICK HERE to check it
out completely! You're in for a MAJOR surprise!
"PRE-SCHOOL DRUMMER?
YES!"
Can we teach rhythm
to pre-schoolers? YES!

This is a very short course,
designed to help adults plant the seeds of rhythm
into children of nearly any age.
CLICK HERE
FREE ELECTRONIC BOOK BONUS (also included)
 BUSINESS OPPORTUNITY:
MAKE BIG MONEY SELLING USED DRUMSETS!
* INSIDER HARDBALL-BUYING-TIPS AND SECRETS.
* UNIQUE RECOVERING SECRETS
Support this site and and gain an advetising bargain with the deal.
 Place a permanent ad here. Place a permanent ad here.
GET ALL THE PRODUCTS AT ONE LOW PRICE.
SURPRISES ABOUND . . . For those with a bit of generosity
in their soul.
CLICK HERE , to see what I mean.
|
|
Downloads *
Drummers Trivia *
Drummers Chat Rooms *
Rudiments *
Digital Music *
Knowledge Assessments *
TD Archives *
Drum Set Buyers Guide *
Bass-Player Jokes *
Assembling a Drum Set *
Parts of a Drum Set *
About HSID *
Video Troubleshooter
Bill Powelson's School of Drums
Tuning Your Drums
 Don't miss the
goldmine of free drum set lessons w/video. Don't miss the
goldmine of free drum set lessons w/video.
Be sure to look into each of the lesson menus on the left, while you are here. It's a $2,000
course, for free!
If you do not yet own a drum set just keep practicing the way you have been. You will appreciate this lesson a little more when you finally get your drums. This lesson is for those students with bad sounding drums.
I contend that even the cheapest drums may be tuned to your satisfaction. The secret is in knowing how to get the sound that you want. When tuning a drumset, you must know what tones you are looking for and how to pull those tones from each drum. I have assembled the following pointers to help you do just that.
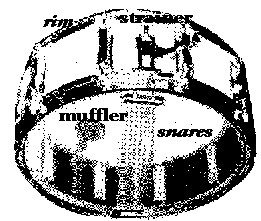
Look closely at your snare drum and try to decide exactly what factors most effect the tonal quality. Notice the 'square headed screws' around the top and bottom rims of the Drum. We call these ‘tension rods' or 'lugs'. We may tighten or loosen these screws with a tool called a 'drum key. A drum key can be purchased at any music store for a dollar or two. Adjustments to the tension rods with a drum key will effect the tension on the Drumhead.
A tight Drumhead will produce more bounce for the Drumsticks and a higher pitch, whereas
less tension on the head will produce the opposite. A little experimentation will help
you decide which you personally prefer.
Be cautious when adjusting the lugs around any drumhead so as not to warp either the
drumhead or the rim. Do not over-tighten one screw while leaving another very loose.
It is best to tighten the lugs in a diagonal crisscross pattern around the head. Cautiously
turn each tension screw an equal number of turns until you have achieved the desired tension.
Now turn your snare drum over and look at the strands of wire underneath. We call these
wires ‘snares'. The ‘snares' produce the ‘snap' sound and give the ‘snare' drum its name. Without
these ‘snares' your drum will sound like a tom tom. The snare wires are usually connected on one
side of the drum with a screw apparatus and a flip lever. The flip lever on most drums is usually
designed to release the snares quickly, so
that a tom effect can be a tonal option. The screw apparatus called the ‘strainer' may
be tightened to place the desired amount of tension on the snares. This will require
some experimentation before you will discover the exact tone you prefer. After tuning
both heads and adjusting the Strainer you may find that your Snare Drum still emits
undesirable 'ring' or 'overtone' when struck a glancing blow with a drumstick. Too much
vibration in the 'batter' (top) head will often cause this overtone, and some type of
muffling device may be necessary. A drum muffler is simply a screw device that places
a felt pad against the batter head inside the drum. The muffler is usually equipped with
a flip lever or turn screw that allows for easy external adjustment. Most snare drums come
from the factory with a muffler installed, but almost any music store will install one for
twenty or thirty dollars (per drum). Again it is up to you to decide whether you like your
drum with or without a muffler.
**************************************************
Check out the
courses (products) in the left column! You can get ALL of them free, with a simple donation
of $45.00 or more. Most of those courses will show you how to put the $45 right back into your
own pocket, A THOUSAND TIMES!
BUY ONE PRODUCT, GET ALL THE OTHERS FOR FREE!
Plus, you'll receive a downloable copy of this entire course that may easily be burned to a
CD.
**************************************************
 If you are still dissatisfied with your tone at this point, you should look at the batter head (top head.) Batter heads are manufactured at varied thicknesses or weights ranging from thin to thick. Thin heads are designed for very light, snappy, crisp tonal qualities but have a tendency to break under heavy use. Thick drumheads will withstand a great deal of punishment but some tonal quality will be sacrificed. The choice is yours.
Tuning the Toms
Now that you have your snare drum tuned to perfection, we will tune the remainder of the set. Begin with the smallest tom . . . It will often be situated directly next to and a little above or even flush with the Snare. This should be your highest pitched tom since it is the smallest. The larger toms should be graduated in both tone and size in clockwise fashion, around you. When tuning your toms, try first to imagine all the tones you want. Then seek to achieve those tones. Remember that tight heads produce higher tones and loose heads produce lower ones. You may wish to experiment with combinations of tight top heads, loose bottoms for one effect or vice versa for the opposite. Some drummers choose to eliminate the bottom tom heads completely. Search for the sound that you like. Drum mufflers will help eliminate any undesirable ‘ring' or 'overtones' in your toms. Many high tech solutions to tom tone have appeared on the market in recent years. Experiment with some of the following options:
- 1. Black Dot: This is a tom head designed with a double thickness of head
material in the center of the drum. The double thickness tends to eliminate some
'overtones' and enhance the life of the head.
- 2. Pinstripe: Pinstripe heads have a double thickness of head material around
the outer perimeter of the drum where most overtones occur. I prefer this type of head.
- 3. Hydraulic: Hydraulic heads involve the sandwiching of an oily substance between
two thicknesses of head material. Many drummers swear by them. The overtones are greatly reduced and the heads are very durable. My opinion is that they do not project very well in a large room. The tone tends to fall flat a short distance from the drum. Microphones can solve that problem though.
BASS DRUM
If you like your bass drum loud and ringing, that is easy! Simply tighten both heads down and do not try to muffle them.
We may get a solid "thud" effect in the following ways:
- 1. Place a 6" x 26" piece of cloth (felt is suggested) between the drumhead and shell of your bass all the way across the drum. You may even choose to cover the entire circular area with thin cloth. Remove the drum rim and head, place the cloth over the hole, then replace the head and rim and pull them to the desired tension. Finally, trim away the ragged edges of cloth.
- 2. Many drummers prefer to eliminate the front head and rim entirely and place different articles of padding inside the Drum (pillows, foam rubber, etc.) until the desired muffle has been achieved.
TIP :
Place a small patch of duct tape at the point where the Bass Drum Beater Ball contacts the head. This will have little effect on the tone but will inhibit wear on the head, prolong its life and save money.
If you are still dissatisfied with your tone at this point, check around and listen to other drummers until you find one who has the sound that you like. Then ask him how he gets it. That is precisely the way I acquired these few tricks that I am sharing with you now!
Good luck!
Working With Music is Important!
It is my hope that by the time you have reached this point in your study. The thrill of playing to music (CDs, records, tapes, radio, etc.) has become your favorite pastime. If it is not, then something needs to be corrected before you go any further. There will be little need to study and perfect any of the beats, rolls and fills in the coming lessons if you are not going to adapt them to music.
If you are having problems adapting the dance beats to music, consider these two factors:
- a. You may need more practice with all the dance beats. You must play them steady and fast for durations of three to four minutes. Most popular songs are at least that long.
- b. You may not be listening close enough to the music you are trying to play. It is important that you listen DEEP into the BACKGROUND of the music and feel the beat the drummer is playing. If you truly feel the beat of the music and have thoroughly studied the The Basic Dance Beats:, then playing with music should come natural.
Here is an interesting, humorous, and somewhat controversial
article, concerning How and Why We Muffle the
Bass Drum.
TRY WORKING WITH HEADPHONES!
Working with headphones will channel the music more directly to your ears and muffle your own drum sounds too. This will allow deeper concentration on the music being played. Beware of excessive volume! You can ruin your hearing for life.
RUDIMENTS, ROLLS and FILLS (Part 1): Boring rolls are not so boring when used as thundering fill patterns in mid-song. (Simplified for beginners!)
| |

